File Management on Columbia’s Computing Clusters
Sometimes it happens that I have a project that requires too much memory for my personal computer, but I need to process more data than can be stored at once on the cluster. While it’s possible to upload the data in chunks, it is much more convenient to automate the process of uploading files to the cluster then downloading them back to my computer. The following provides a guide for this process for Windows users. If you are a Mac user, it may be possible to adapt this guide using Mac’s built-in FTP server as here. I am currently using Yeti, but it should work similarly for Habanero.
1. Download FileZilla Server (make sure you get the server and not only the client). This provides an FTP server will allow you to make files on your computer available through FTP.
2. Follow the installation guide here. For security reasons, I would make sure that your shared folder is isolated from any personal/private files in case someone manages to gain access to your ftp server.
3. Since Yeti only allows secure ftp (SFTP or FTPS), you will need to go to edit->settings->FTP over TLS settings and click “Enable FTP over TLS support” (you may want to click “Disallow plain unencrypted FTP” if you want all of your ftp encrypted). You can then generate a new certificate. Make sure “Allow explicit FTP over TLS” is also checked. You will need to uncheck “Require TLS session resumption on data connection when using PROT P” at the bottom, I don’t fully understand why but it will cause problems later.
4. If you are on a Columbia University WiFi network, you can ignore this step.
If you are behind a personal router, you will need to set the passive mode settings by going to Edit->Settings->Passive mode settings. FileZilla will likely warn you about this when you connect to the server for the first time. You will need your local IP address that your router gives to your computer that starts with 192.168.0. You can find this by going to the Network and Sharing Center from the Control Panel and clicking on your internet connection then clicking on “Details…” and looking at the IPv4 Address. Enter this address under “External Server IP Address for passive mode transfers:” instead of Default.
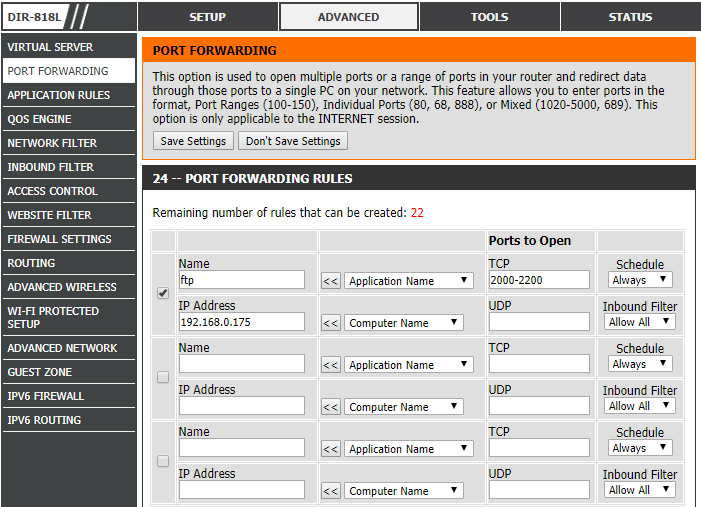
You will also need to configure your router to let the ftp traffic through. This will look somewhat different for each router, but here is what mine looks like. You will need to again put in your local IP address and choose which ports to use.

5. Now you should be able to use the curl command from Yeti to move files back and forth from your computer. To do this, you will need to know your internet-facing IP address. You can find this by Googling “what is my ip” and it should come up. Use the following command to copy a file from your computer to Yeti, substituting USERNAME and PASSWORD for the user you set up in your FileZilla server and substituting your ip address and the port you told FileZilla to listen on:
curl –ftp-ssl -k –user USERNAME:PASSWORD -O ftp://YOURIP:PORT/input.txt
You can then run a job on yeti that takes an input file input.txt and produces an output file output.txt. Then to copy a file from the cluster to your computer use the following:
curl –ftp-ssl -k –user USERNAME:PASSWORD ftp://YOURIP:PORT/ –upload-file output.txt
One note is that the Yeti documentation asks that users do not use the head node for large data transfers. However, it claims you can use the internet within a job by loading a module, but that does not work. This process will use the head node, but I don’t see a good alternative.
Here is a small example with some shell script that will tell the cluster to download a file from your computer, run some code, produce an output that is then transferred to your computer and then removes all files from Yeti. You should put the test data on your local computer and the other three files on the cluster. You will need to edit the yeti job file with your uni and the bash file with your FTP information. You can then type “bash yeti_example.sh” on the cluster to run the code.
bash file for downloading, running, then uploading output

I spent a great deal of time to find something like this